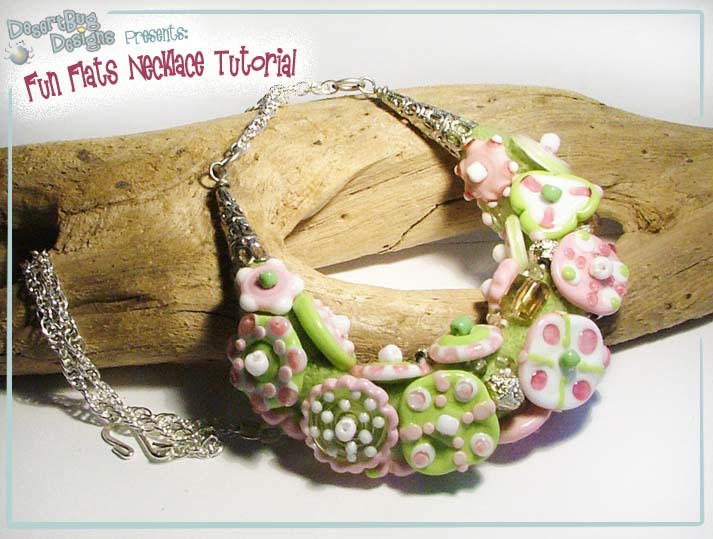
Make a Fiber & Glass Necklace with a DesertBug Designs "Fun Flats" Set

Here is a lovely and whimsical necklace you can make easily with a set of my Fun Flats, and a few other assorted accent beads. It can also be adapted to a cool bracelet!
|
|
|
Instructions
Click on any picture for a larger view...
 |
STEP 1:
Gather all of your materials and tools together.
|
 |
STEP 2:
Lay the fabric rectangle flat, and apply 3 stripes of fabric glue, leaving about a 1/4" away from what will be the seam you will roll towards. Put the 6mm cord on one side over a stripe of glue. |
 |
STEP 3:
Roll the fabric rectangle around the cord, completly covering it. |
 |
STEP 4:
You should have a fabric covered cord now, something like the picture. |
 |
STEP 5:
Clip the cord with the bag clips, and let it dry according to your fabric glue's directions. |
 |
STEP 6:
Once your glue is dry, trim your cord down to the size you want it to be. For this project, I trimmed it to 6 1/2 ".
Note: If you want to make a bracelet instead of a necklace, you should trim the fabric cord to 5" or so at this point for about a 7" wrist. |
 |
STEP 7:
Wirewrap one end of the fabric cord, leaving a long tail about 3" or so extending out. Repeat on the other end.
|
 |
STEP 8:
Now, slide your end cap over the wire tail and snug it over the wirewrapped cord end. Repeat for the other end. |
 |
STEP 9:
Make a large wirewrapped loop at the end of one bead cap. Repeat on the other side.
|
 |
STEP 10:
Now, your covered cord piece should look similar to this. |
 |
STEP 11:
Now, roughly layout your Fun Flats set deciding how you'd like to attach the beads. Thread your needle with 2 strands of embroidery thread, and knot. |
 |
STEP 12:
Start by running your knot end just under the seam of the covered cord, hiding it. run the needle out the top.
|
 |
STEP 13:
Attach the first bead by running the needle through th bead, through an "E" bead, then back through the bead hole and through the cord to the backside.
|
 |
STEP 14:
On the backside, where the thread comes out, string an "E" bead on, and sew back through the cord to the top where the next bead will be attached.
|
 |
STEP 15:
Keep sewing the beads on by running the needle through a bead, through an "E" bead, then back through the original bead hole. Where you come out on the backside, attach "E" beads, so no stitches show.
|
 |
STEP 16:
When you run out of thread, try and make your knot under the seam to hide it, and run the tail of the thread through the cord a few inches, and snip the tail off at the fabric surface. Rethread your needle, and continue. Once all your Fun Flats are added, you can fill in with other assorted bead types, as much or as little as you want. |
 |
STEP 17:
When all your beads are attached, you should have a piece that looks simialr to this. |
 |
STEP 18:
Now, add a 6 mm jumpring to one of the end loops, and attach the 7" chain to it. Repeat for the other side. You can adjust the chain longer or shorter depending on your necklace length preference.
Note: To make a bracelet, add jumprings to the ends, and then attach a toggle clasp, and your braclet is finished. |
 |
STEP 19:
Now, add a 6 mm jumpring to one of the chain ends, and attach 1/2 of your clasp to it. Repeat for the other side, attaching the other clasp end. |
 |
STEP 20:
Your necklace is now finished, and ready to wear! Remember, you can always change this guide to suit you taste, adding different stringing material instead of chain, making a larger or smaller central cord piece, just let your imagination run wild!
|
| |
|
| |
|
Back
to the Main Tips & How-to's Page
|
Lampwork and fusing work can both be dangerous if not properly
undertaken, and you should take care to inform yourself of all safety issues/precautions/and
risks associated with these endeavors.
All instructions/photos on this page are copyrighted
by DesertBug Designs/T. Ryan and have all rights reserved.
This material may not be published, broadcast, rewritten, or redistributed
in any form without express written permission of DesertBug Designs/T. Ryan.
|


